Easy Acrylic Painting Ideas for Beginners On Canvas
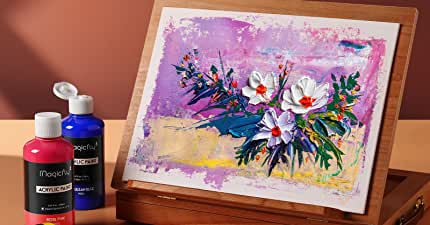
Are you looking for a fun way to get creative and express yourself? Painting might be the answer! It doesn’t matter what is your painting skills, acrylic painting is a great way for beginners to get started because the materials are relatively inexpensive and the techniques are easy to learn.
In this article, we’ll give you seven easy acrylic painting ideas that will get you inspired for your next project.
For each idea, we will provide a brief description and list the supplies you will need in a step tutorial way. So, what are you waiting for? Let’s get started today!
Affiliate Disclaimer: This post may contain affiliate links, which means I will receive a commission if you make a purchase using these links.
Easy Painting Ideas
1. Still Life Composition
Still life is a type of painting that typically features inanimate objects such as flowers, fruits, or vegetables. The purpose of a still life composition is to arrange these objects in a way that looks visually appealing to the viewer.
This type of painting became popular during the Renaissance period as a way for artists to explore the natural world and their own creativity.
While the subjects of still-life paintings vary, many feature everyday objects such as flowers, fruits, and vegetables.
Understanding Still Life Composition Process
A still life composition painting is a great way to practice painting objects in a realistic way. Start by finding an object to paint that has interesting shapes and colors. Try to avoid painting objects that are too symmetrical.
Once you have chosen your object, sketch it out on paper to plan the composition of your painting. Next, start painting the object using thin layers of paint to create realistic textures. Make sure to pay attention to the shadows and highlights of your object.
Materials Used:
- Still life composition objects
- Acrylic colors
- Paint brushes
- Palette
- Palette knife-for mixing paint
- Canvas-a size that you are comfortable with
- Paper towel or rag-for drying and cleaning brushes
- Water
- Acrylic gloss varnish (optional)- for sealing finished painting
Acrylic painting tips: Because acrylic is a fast-drying paint, you can complete this composition in one setting using the alla prima painting technique. Don’t be afraid to add your personal touch.
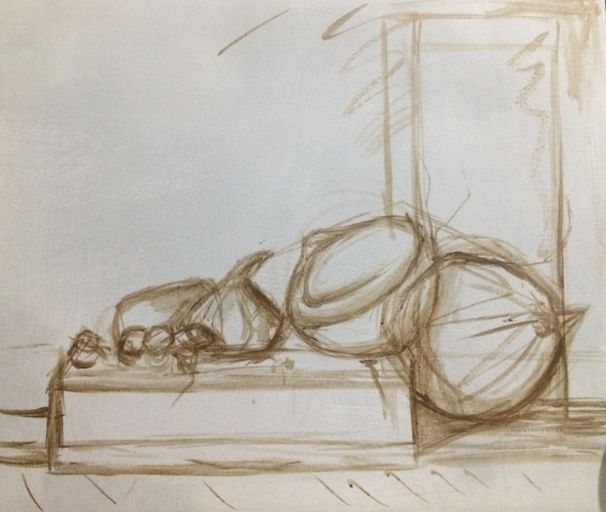
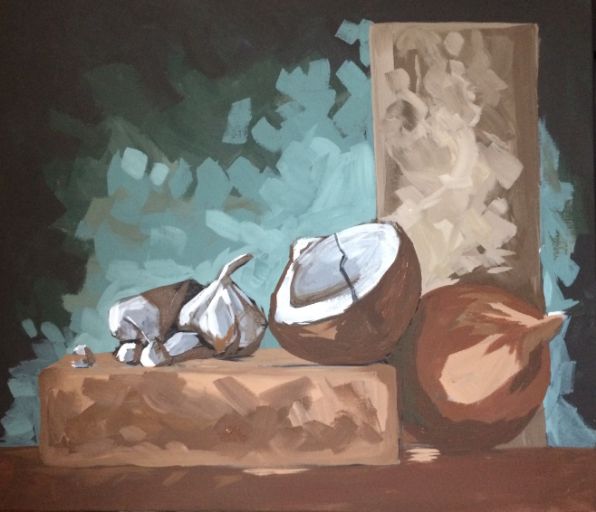
Coconut Choka by Roberto Teekah
Coconut Choka. Stage One: Construction and Composition-Using the Paintbrush.
In the first stage of the painting process, I always encourage my students to focus on construction and composition.
The aim in this stage is to sketch all the objects that will be a part of your composition in a very basic way.
Here Roberto chose the ‘L’ shape composition techniques for his still life composition and is using his paintbrush like a pencil to make his initial sketch.
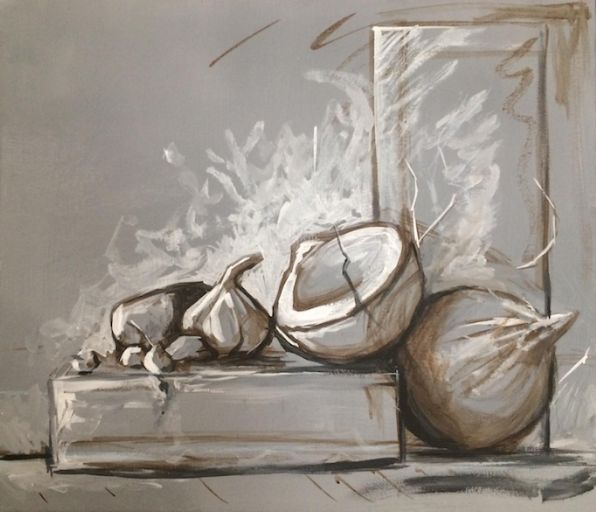
Coconut Choka. Stage Two: Underpainting and Blocking out Basic Forms.
Underpainting is a technique used in acrylic painting where the artist paints a thin layer of paint over the entire canvas before adding the main colors.
This initial layer serves as a foundation for the painting and helps to create a cohesive look. It can also establish values and create contrast.
Here Roberto chose to use a very neutral color for his underpainting stage. You can choose like he did to pay attention to the light and dark areas in the composition.
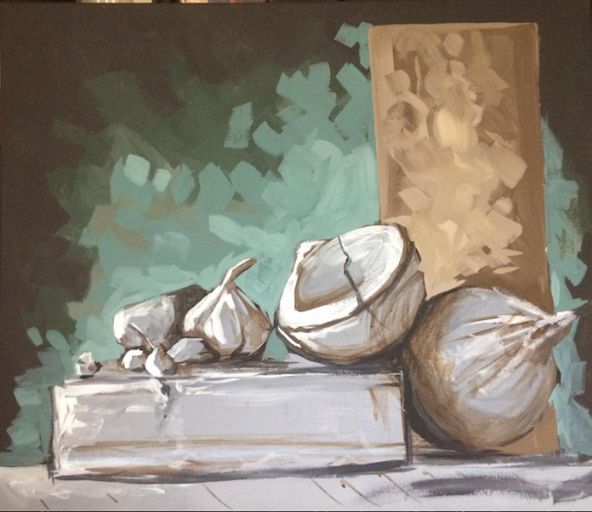
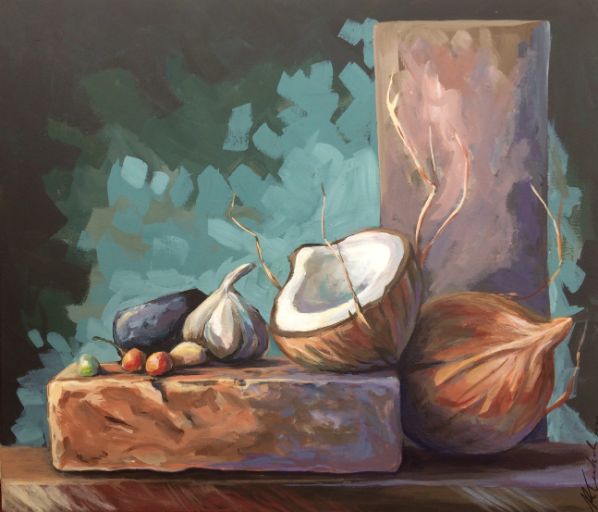
Coconut Choka. Stage Three: Creating Form and Adding Colors.
At this stage, you will add some of the basic colors of the object over the underpainting. Some will refer to this as adding the local color of the objects.
Coconut Choka. Stage Four: Developing Form and Basic Details.
In this stage, the underpainting is no longer visible and the local colors of the objects become more dominant.
From here, you will pay closer attention to creating the three-dimensional effects of the objects by focusing on the areas of lights, darks, and shadows.
Coconut Choka. Final Stage: Completing the Composition.
In acrylic painting, the final stage is usually the most important. This is when you add the details that make your painting look finished. It’s also when you correct any mistakes you may have made earlier in the painting process.
At this stage, we get to appreciate the color scheme used by Roberto, as well as his clear understanding of the fundamentals of still life painting.
You see his effective use of light and dark to create form and his use of values to create the illusion of space in the composition.
This is where you can choose to use the acrylic varnish after letting the paint dry properly for a few days.
2. Buildings and Man-made Structures
One of the oldest and most popular subjects for artists is man-made structures, such as buildings and bridges. Painters throughout history have been drawn to these imposing and often beautiful creations. In many cases, the artist’s goal is to capture the structure’s essence in a painting, whether it be the grandeur of a Gothic cathedral or the simple elegance of a classical column.
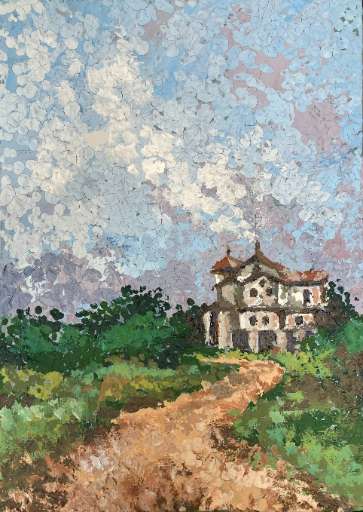
Old House by Atashieha Bovell
Materials Used:
- Picture of an old house
- Acrylic paint
- Q-Tips: to apply the stippling technique
- Palette
- Water
- Pencil
- Watercolor paper
- Masking tape: to stretch the paper
- Paper towel/rag
Acrylic painting tips: This activity is time-consuming, but it is also a lot of fun. You will be pleased with the final results.
Not every acrylic painting requires a brush. Sometimes artists get creative and use other materials to apply paint to the surface of their canvas or paper.
Here Atashieha made effective use Q-Tips to help her with the stippling technique to create an impressive composition.
Despite using a limited color palette, she could still capture the derelict characteristics of this old house while using black to great effect in her composition.
Give this idea a try. I am sure you can find an old house in your area or a picture of an old house that you can get creative with.

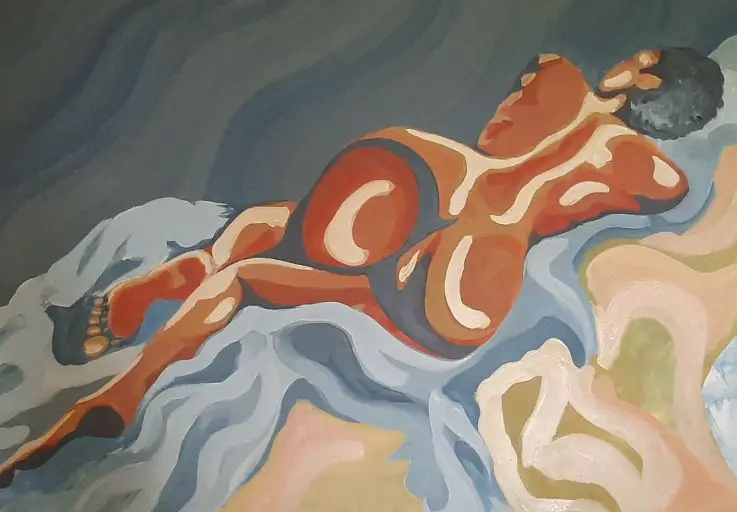
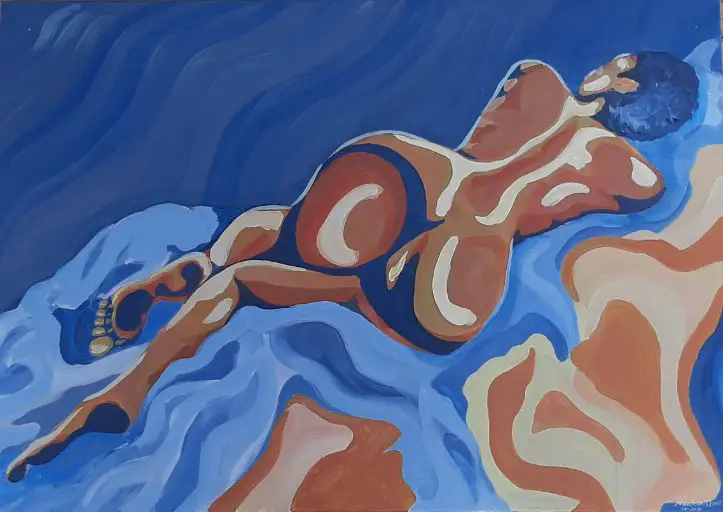
3. The Female Nude
Many artists choose to paint the female nude in acrylic. This can be a very challenging subject, as there are many subtleties that must be captured in order to create a realistic and believable portrayal. In order to achieve success with this type of painting, it is important to understand the different techniques that can capture the nuances of light and shadow on the skin. It is also important to understand how to mix colors in order to create realistic flesh tones.
Color Me Blue by Minerva Duke
Materials Used:
- Female model or picture of female
- Conte pencil
- Acrylic paints
- Paintbrushes
- Palette knife
- Palette
- Water
- Paper towel or rag
- Acrylic varnish
Acrylic painting tips: If you are adventurous enough, you can work with a live model and focus on the geometrical shapes of the figure.
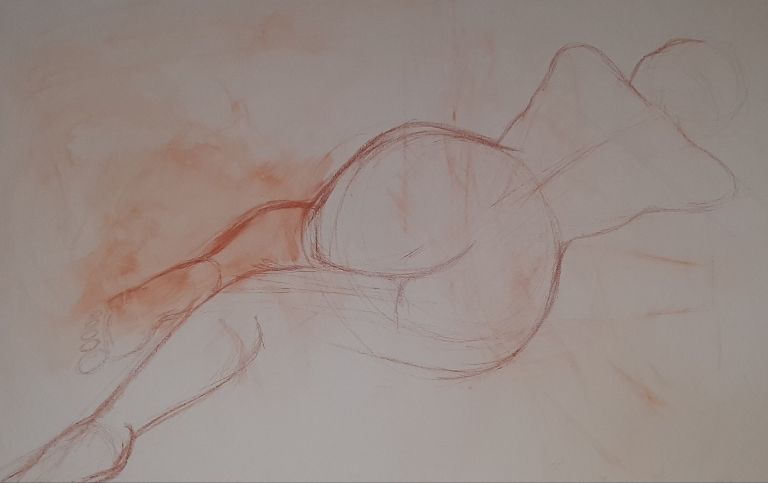
Color Me Blue. Stage One: Layout and Composition-Using Pencil.
The first stage of painting the female nude is you need to sketch out your idea on your canvas. This can be done with a pencil directly onto the canvas as Minerva did here.
If you are not very good at drawing the human figure, you can use the grading system (learn more here), or you can trace the subject on your surface using a projector like the Artograph Tracer Opaque Art Projector or any other good projector from amazon.
Once you have the sketch, you can plan out the colors you will need.
In this first stage, because Minerva is competent in drawing the human figure, she would have sketched out the figure using a soft pencil.
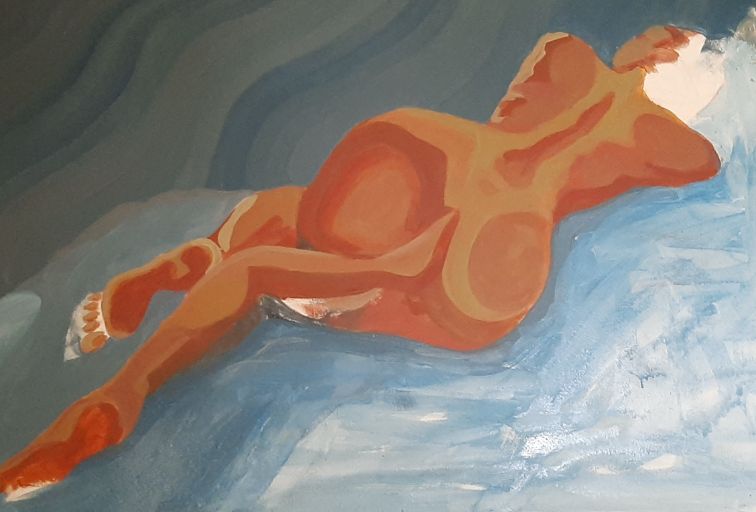
Color Me Blue. Stage Two: Adding Basic Layers of Colors.
In the second stage of painting the female nude, you will be working on adding the basic colors to your composition.
This includes adding colors, defining the edges, and adding colors to get rid of all the white areas on the canvas.
You may also think about the composition of your painting and make any changes necessary.
Minerva covered all the major areas in her composition with simple color values.
Color Me Blue. Stage Three: Adding Details and Lights and Shadows.
In the third stage of the acrylic painting process, Minerva continues to add layers of paint to the canvas.
This stage is often called the “painting out” phase, as the artist strives to create a balanced and cohesive composition. During this stage, some artists may also define areas of light and shadow.
Color Me Blue. Final Stage: Adding Fine Details and Varnish.
The final stage of the acrylic painting process adding all the fine details finishing touches and varnishing. This step protects the painting from dust and other pollutants and also gives it a glossy finish.
There are two types of varnish that can be used: a gloss varnish, which gives the painting a high shine, or a matte varnish, which gives it a more subdued look.
Varnish should be applied in thin layers, allowing each one to dry completely before applying the next.
4. Mythologies and Folklores
Since the beginning of time, people have been fascinated with stories and legends that explain the natural world around them.
These myths and folklore often take the form of paintings, providing a visual representation of these ancient tales.
Acrylic paintings can be extremely evocative, capturing the essence of a story or myth in a way that words cannot.
In The House with 99 Windows, Roberto did an excellent job of capturing the eerie mystery around this Guyanese folklore.
The House With 99 Windows by Roberto Teekah
Materials Used:
- Photo reference
- Acrylic paints
- Palette knife
- Plastic palette
- Canvas board
- Water
- Paper towel or rag
Acrylic painting tips: For this project can use online as one of your image source. Experiment with the palette knife, like Roberto did in some areas like the sky.
5. Seascape and Beach Scene
Paintings of the sea can be some of the most beautiful and calming works of art. They can also be a great way to relax and escape from the stress of everyday life.
Sea scenes have long been a popular subject for painters. Traditionally, oil paints were used to create these works of art, but acrylics provide a new option for artists who want to capture the power and beauty of the sea.
Acrylic paint is a versatile medium that can be used in a variety of ways to create different effects. Follow Atashieha Bovell’s steps below to help you create your own seascape painting with acrylics.
Golden by Atashieha Bovell
Materials Used:
- Picture of seascape
- Blank canvas
- Paintbrushes
- Wooden palette
- Acrylic paints
- Piece of paper
- Water
- Paper towel or rag
Acrylic painting tips: Don’t be afraid to experiment with various brushstroke techniques in this project. You can also use more bright colors in your palette.
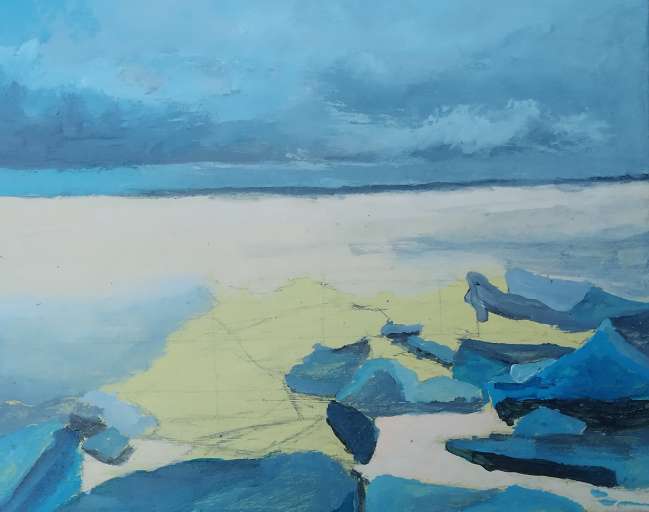
Golden. Stage One: Layout and Composition-Using the Grid System.
Grids are a great way to plan out a painting, especially when working with a complex subject like a seascape. By using a grid, you can break the painting down into smaller, more manageable parts. This makes it easier to keep track of the different elements in the painting and to ensure that everything is properly proportioned.
Notice the grid lines still visible in stage one of Atashieha seascape scene entitles Golden. Use this layout system for your seascape as well. It will make the process faster for you as a beginner.
Golden. Stage One: Filling in Shapes and Forms With Simple Colors
In this stage of the painting process, Atashieha added in the sky, rocks and water in a very basic way. To create the sky, various values of blues were used along with white acrylic paint.
She creates some lovely impressionistic representations of the clouds in the sky with various gradients of colors from the top of the painting to the horizon line.
The basic shapes and forms of the rocks in the foreground have also taken shape. At this stage, you can feel and see the spatial relationships between the objects in the composition.
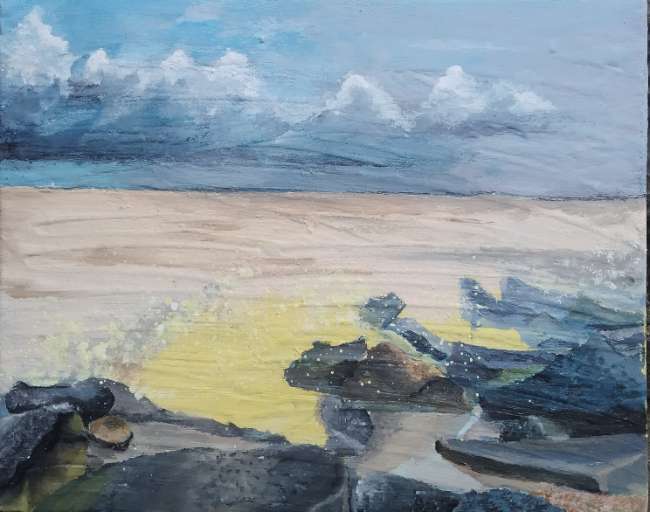
Golden. Final Stage: Capturing the Essence of the Scene With Details
The final stage of painting a seascape with acrylic paints is to add the finishing touches. This involves adding highlights and shadows to the painting to create depth and realism.
Adding highlights can be done by using light colors, such as white, yellow, or light blue. To create shadows, use darker colors, such as blues and purples.
It is important to blend the colors well to create a smooth transition between them.
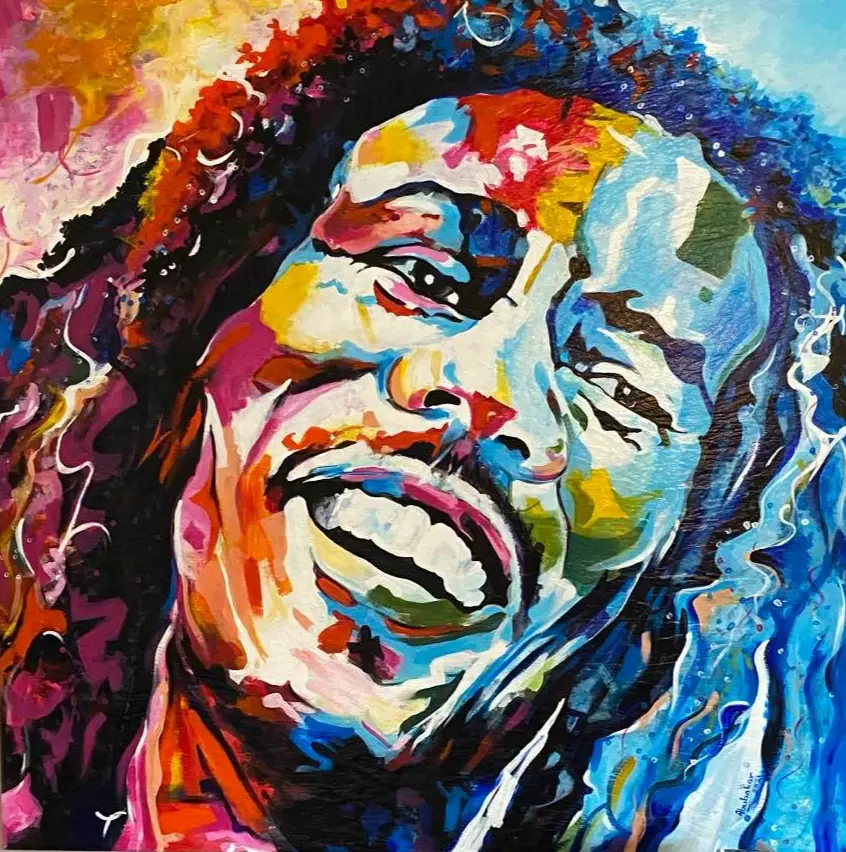
6. Painting Your Musical Icon
Do you like to listen to music? Do you have a favorite band or singer? Chances are, you have some posters or pictures of your favorite musical icons hanging on your walls.
Why not paint them yourself? With the beauty of acrylic paint, it’s easy to create your own masterpieces of your favorite musicians.
Tuff Gong by Randy Bentinck
Materials Used:
- Different colors acrylic paints
- Palette knife
- White canvas
- Synthetic brushes
- Fine brush
- White paint to prime your canvas
- Rag
- Polymer varnish with UVLS (gloss)
- Water
- Cup
Acrylic painting tips: A project like this requires lots of patients if you are a beginner, because of the amount of small details. Don’t give up! Look for the shape of colors and fill them in like it’s a paint by number project.
7. Self-Portrait
In this self-portrait, Onessa captures the way I feel inside: bright, bold, and colorful. She used acrylic paints and expressive brush strokes to create a happy and bright self-portrait that reflects her personality.
The colors are intense and the brushstrokes are expressive, giving the painting a feeling of life and movement. I am happy with the way the painting turned out. It is an accurate representation of her Delicate Beauty.
Delicate Beauty by Onessa Evans
Materials Used:
- Reference photo
- Acrylic paints
- Canvas
- Acrylic paint
- Graphite pencil
- Paintbrushes
- Palette knife
- Plastic palette
- Paper towel or rag
Acrylic painting tips: You can use a projector to trace your picture onto your canvas to capture the basic features accurately.
Delicate Beauty. Stage One: Blocking in the Basic Forms.
Onessa Evans: “After having properly prepared my canvas, I started laying out my painting. Working from a reference photo, I sketch the key features using a graphite pencil. After that, my focus was just blocking in the basic forms. I wasn’t focusing that much on achieving much likeness.”
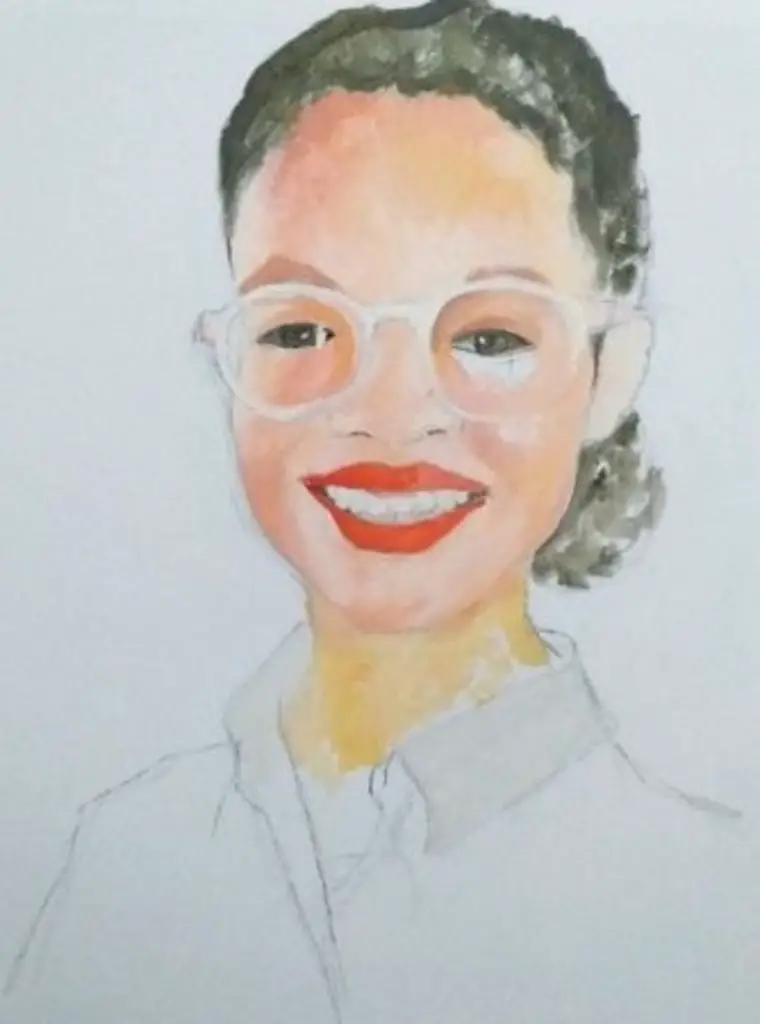
Delicate Beauty. Stage Two: Building up Color Intensity and Form.
Onessa Evans, “At this stage, I continued to build the intensity of my colors and forms. I focused more on rendering the forms and capturing some amount of likeness.”
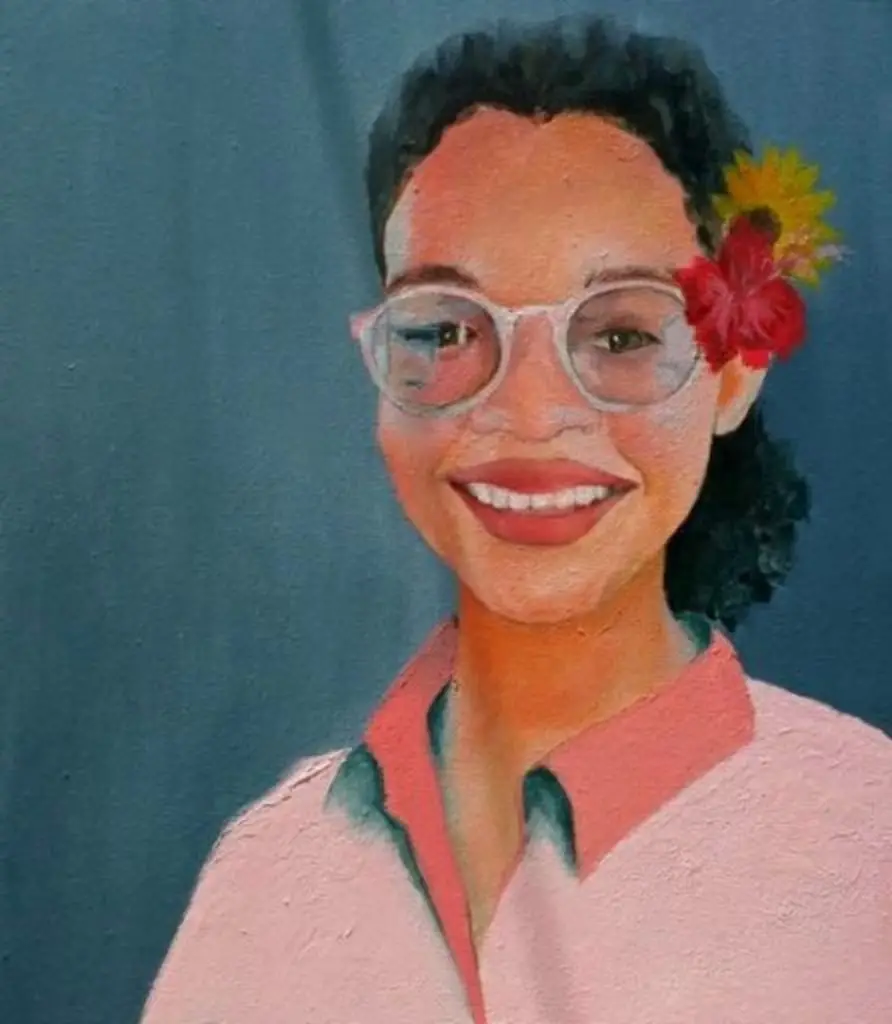
Delicate Beauty. Final Stage:
Onessa Evans: For this assignment, we were asked to create a painted composition using a subject of our choice with a specified color palette, using warm and cool greys to complement our warm colors, and showing our understanding of the concept of color juxtaposition.
I had worked with the Zorn palette for the first time.
This palette comprised four colors, but I included blue for my background.
I found the Zorn palette to be a great learning tool as it limits the number of decisions but allows a wide-enough number of colors to create a stunning painting.
While I was at the stage of gathering information, it faced some problems understanding the warm and cool greys and how to apply the information to my painting. But after some time, I could work with more confidence.
I used juxtaposition to emphasize my concept (Delicate Beauty). Using two primary colors: red and yellow (hibiscus and sunflower).
My first time using the Zorn Palette was a satisfying experience, and I’m happy with the final results of my finished composition.
l will continue to use this color palette and expand my knowledge and understanding to produce more stunning works.
Concluding Thoughts on Easy Acrylic Painting Ideas for Beginners On Canvas
In conclusion, acrylic painting is a great way to express yourself and can be a fun, relaxing activity. The seven easy acrylic painting ideas for beginners on canvas are just a starting point.
Remember, there are many more simple acrylic painting ideas you can experiment with. You can create your own unique pieces by using your own imagination and inspiration.
You can use them as wall art for your home, they can also make a great gift for someone special. So get creative and have fun with your next painting project!
Thanks for taking the time to read. Which of the seven easy acrylic painting ideas for beginners on canvas will you try today? Let us know in the comments section below.

Leave a Reply