DIY Craft Ideas For Beautiful Home Decor

Elevate your greenery and give your room a touch of nature with a DIY Wood Plant Stand.
This woodworking project is not only an eye-catcher but also incredibly practical, perfect for any corner that needs sprucing up.
1. DIY Wood Plant Stand
Create your wood plant stand to bring life into any room. This project is simple and budget-friendly, perfect for any level of DIY expertise.
It would help if you had some essential tools and supplies from a local hardware store. Then, follow the steps to build a sturdy base for your potted plants.
This woodworking project adds style to your home decor in no time. It’s more than just function; it’s a conversation piece that showcases greenery with elegance.
Show off your craftsmanship and give plants their particular spot in the house with this do-it-yourself stand.
Easy How to Guide:
A DIY wood plant stand is a rewarding project that adds a touch of nature to your home. Here’s a simple guide to making one:
- Materials Gathering:
- Collect the necessary materials, including wood planks, screws, a saw, and sandpaper to smoothen the edges [1].
- Design Planning:
- Choose a design for your plant stand. It can be a simple single-tiered stand or a more intricate tiered design for multiple plants [4].
- Cutting and Sanding:
- Cut the wood planks according to your chosen design using a saw. Sand the cut edges for a smooth finish.
- Assembly:
- Assemble the pieces, securing them with screws. Follow the specific instructions or plans you’ve chosen for the plant stand design [6].
- Finishing Touches:
- Apply a wood finish or paint to enhance the aesthetics of your plant stand. Allow it to dry thoroughly.
- Placement:
- Once the DIY wood plant stand is complete, place it in your desired location and proudly display your favorite potted plants.
This process allows you to customize the plant stand to your preferences and create a unique piece that complements your home decor.
2. DIY Hanging Shelf

Transform an empty wall into a functional art display with a DIY Hanging Shelf.
This chic and straightforward project not only adds character to your space but also offers a stylish solution for showcasing your favorite trinkets.
Find out how you can create one yourself!
An Easy How to Guide:
Creating a DIY Hanging Shelf is a simple and stylish project that can be accomplished with a few materials. Here’s a basic guide:
- Materials Gathering:
- Collect the necessary materials, which typically include boards, a dowel rod, rope, and basic tools for cutting and drilling.
- Measure and Cut:
- Measure and cut the boards to the desired length for your shelf. This will serve as the main surface of the hanging shelf.
- Staining or Finishing:
- Optionally, stain or finish the boards to enhance their appearance. This step adds a personal touch to the project [2].
- Drill Holes:
- Drill holes near the corners of the boards where the ropes will pass through. Ensure the holes are evenly spaced for balance.
- Thread the Rope:
- Cut lengths of rope and thread them through the drilled holes. Tie knots under each hole to secure the shelf in place.
- Hang the Shelf:
- Hang the shelf from a sturdy anchor point, such as a hook in the ceiling or a wall-mounted bracket.
- Adjust and Level:
- Adjust the lengths of the ropes as needed to level the shelf. Ensure it hangs securely and evenly.
- Final Touches:
- Make any final adjustments, and your DIY Hanging Shelf is ready to showcase decorative items or serve as functional storage.
This project provides a customizable and cost-effective way to add a unique display element to your living space.
View the video below for additional ideas:
3. DIY Coffee Bar Sign
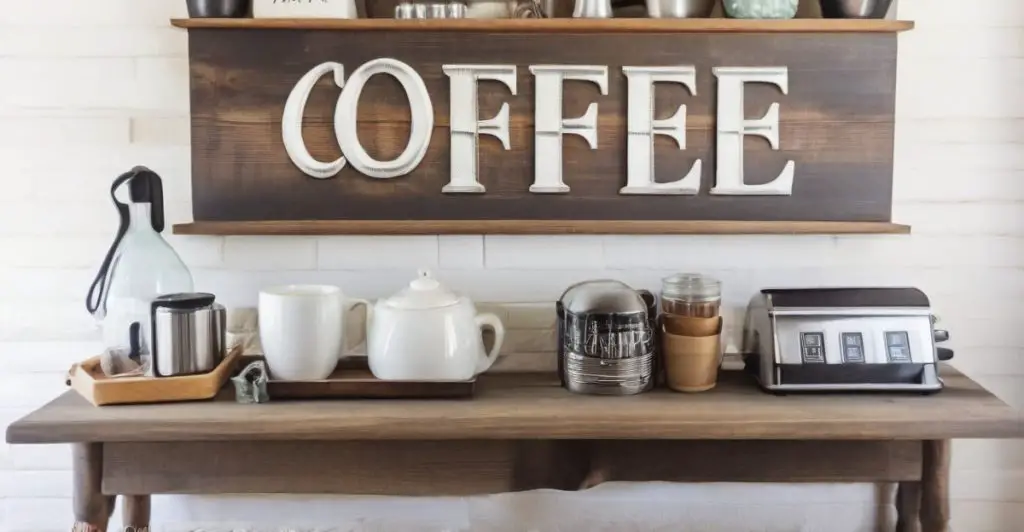
Transform your morning routine into a chic café experience with a DIY Coffee Bar Sign.
Simple materials and a touch of creativity are all you need to craft this charming focal point that’s sure to perk up your kitchen decor.
A Simple How to Guide:
This DIY Coffee Bar Sign is a fun and customizable project to add a personal touch to your coffee station. Here’s our simple guide on how to make one:
- Material Selection:
- Gather materials such as a wooden board, paint, vinyl lettering, and any additional decorative elements you’d like to include.
- Prepare the Wood:
- If starting with a raw wooden board, sand it to achieve a smooth surface. You can also distress the wood for a rustic look.
- Painting the Background:
- Apply a base coat of paint to the wooden board. This can be a solid color or a distressed finish, depending on your style preference.
- Add Vinyl Lettering:
- Cut or purchase vinyl lettering in the desired font and style. Apply the lettering to the painted board, creating the coffee-related phrase or sign.
- Optional Decorative Touches:
- Enhance the sign with additional decorative elements, such as coffee cup illustrations, borders, or any creative details that suit your taste.
- Seal and Protect:
- Once satisfied with the design, seal the sign with a clear protective coat to preserve the paint and vinyl.
- Hanging or Displaying:
- Determine how you want to display the sign. It can be hung on the wall, placed on a shelf, or incorporated into your coffee bar setup.
- Personalize:
- Feel free to personalize the sign further with your favorite coffee-related quotes, images, or any unique touches that resonate with you [2].
Creating your DIY Coffee Bar Sign allows for creativity and customization, making it a charming addition to your coffee-loving space.
4. Easy DIY Tassel Throw Blanket
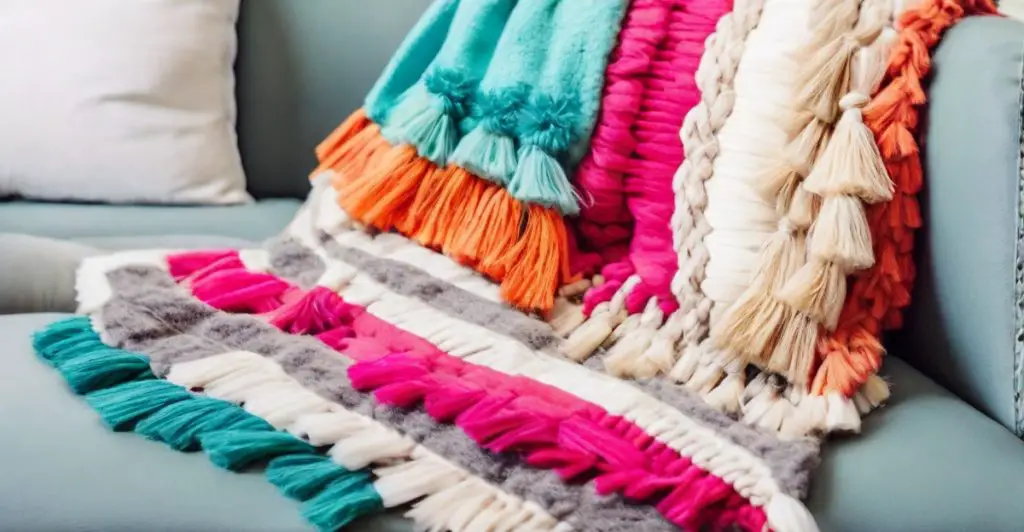
Transform your cozy evenings with a homemade touch! Crafting a DIY tassel throw blanket is not only simple, but it adds an instant splash of elegance and comfort to any room.
With just some basic materials and a dash of creativity, you can whip up this stylish accessory that’ll make your sofa or armchair look like it’s been styled by an interior designer from Elle Decor.
Our Easy How to Guide:
Embarking on a simple DIY project to make a Tassel Throw Blanket can enhance your home decoration. Here’s an uncomplicated step-by-step guide for crafting one:
- Materials Needed:
- Gather a throw blanket and yarn in your desired color. The yarn will be used to create the tassels.
- Prepare Yarn Tassels:
- Cut the yarn into equal lengths for each tassel. Use a piece of cardboard or your fingers to wrap the yarn multiple times, creating a bunch. Tie a separate piece of yarn around one end of the bunch and cut through the opposite end to form individual tassels.
- Attach Tassels to the Blanket:
- Tie each tassel onto the edges of the throw blanket. You can space them evenly or cluster them in a particular pattern, depending on your preference.
- Trim and Adjust:
- Once all tassels are attached, trim any uneven lengths to ensure a neat and uniform appearance. Adjust the positioning of the tassels if needed.
- Secure Knots:
- Double-knot each tassel to secure it firmly to the blanket, preventing them from unraveling during use or washing.
- Personalize and Enjoy:
- Feel free to experiment with different yarn colors, lengths, or even add embellishments for a personalized touch. Once completed, your Easy DIY Tassel Throw Blanket is ready to cozy up your space.
This project is not only simple but also allows for creativity and customization, making it a perfect addition to your home.
5. Farmhouse Style Coat Rack
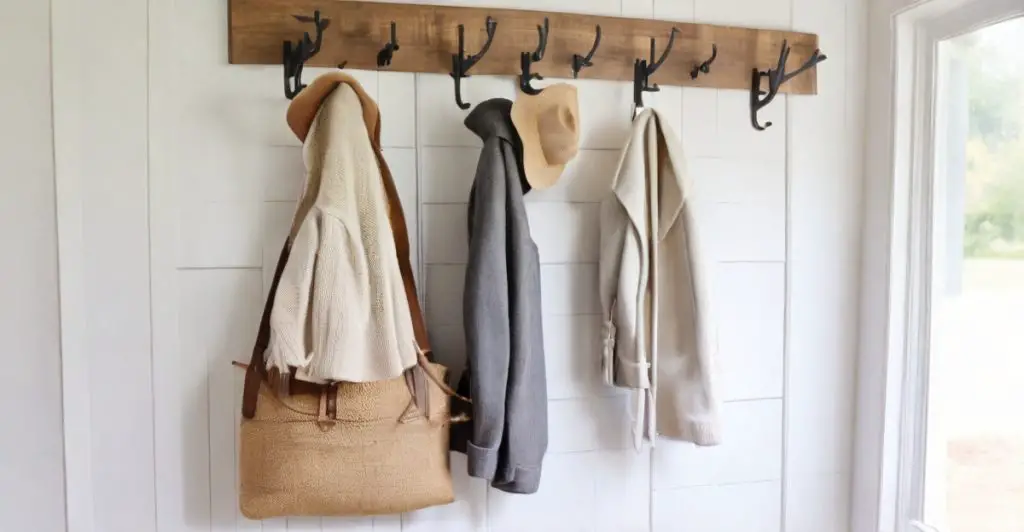
Revamp your entryway with a touch of rustic charm by crafting a farmhouse style coat rack is perfect for adding organization and country flair to your home.
Get ready to hang up those jackets in DIY style!
Step-by-Step Guide:
A Farmhouse Style Coat Rack can add an appealing and valuable element to your foyer or mudroom.
Here’s an easy-to-follow manual for crafting your own Farmhouse Style Coat Rack:
- Materials Needed:
- Gather materials such as a wooden board (preferably rustic or reclaimed), vintage-style hooks, screws, a drill, and a tape measure.
- Prepare the Board:
- If the board is not already finished, distress or paint it in a farmhouse-style color. This adds character and complements the rustic aesthetic.
- Measure and Mark:
- Determine the desired length of your coat rack and mark the positions for attaching the vintage hooks. Use a tape measure to ensure even spacing.
- Attach Vintage Hooks:
- Drill pilot holes at the marked positions on the board and screw in the vintage hooks securely. Vintage-style hooks contribute to the farmhouse look.
- Mounting Options:
- Decide whether you want to mount the coat rack directly on the wall or use brackets for a floating effect. Ensure it is securely attached to the wall.
- Optional Shiplap Detail:
- For an extra farmhouse touch, consider adding shiplap detailing around the coat rack. This can be achieved with additional wood pieces attached horizontally.
- Final Touches:
- Check for stability and make any final adjustments. Consider distressing the coat rack further for an aged appearance if desired.
- Hang and Enjoy:
- Mount the finished coat rack in your chosen location. Now, you have a stylish and functional Farmhouse Style Coat Rack for organizing coats, hats, and bags.
This project allows for customization, so feel free to adapt the design to suit your preferences.
6. DIY Desk Using a Door
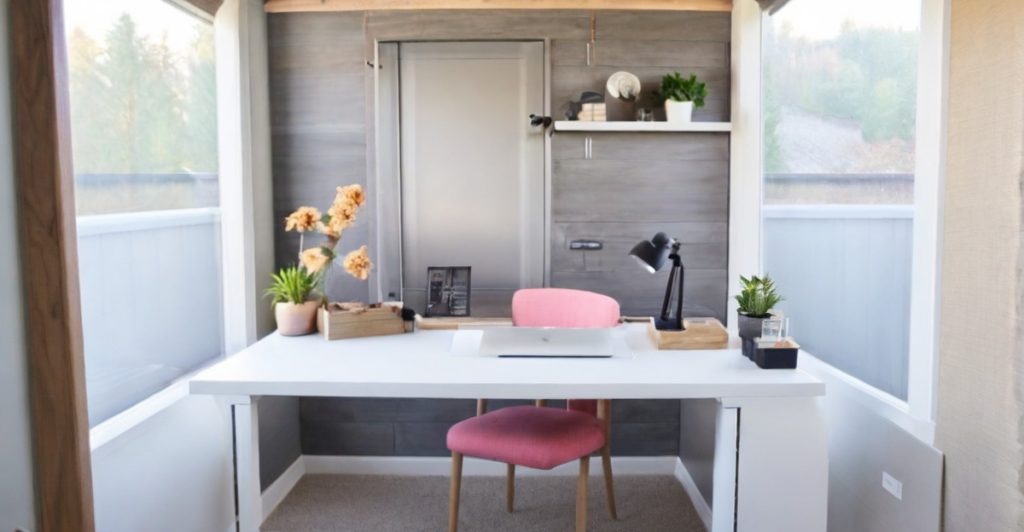
Transform an old door into a unique and spacious desk with this innovative DIY project.
It’s the perfect way to re-purpose materials you might already have, adding a touch of rustic charm and character to your home office or study area.
An Easy to Follow Guide:
The project of transforming an old door into a DIY desk is an innovative and cost-effective way to utilize unused doors as practical office spaces.
Here’s an easy-to-follow guide on how to do it yourself:
- Select a Suitable Door:
- Choose a solid door of the desired size and style. Consider using salvaged or repurposed doors for a unique touch.
- Measure and Trim:
- Measure the intended desk area and trim the door to the desired length if needed. A circular saw or handsaw can be used for this step.
- Sand and Prep:
- Sand the door to create a smooth surface. Fill any imperfections with wood filler, and sand again for a clean finish.
- Design the Top:
- Depending on the door’s style, you can add a protective and stylish top. Options include sanding and staining the existing surface or attaching a new desktop material.
- Attach Legs or Supports:
- Choose sturdy legs or supports for the desk. These can be purchased or repurposed from other furniture. Attach them securely to the door, ensuring stability.
- Paint or Stain:
- Apply paint or stain to match your aesthetic preferences. This step adds a personal touch and protects the wood.
- Add Additional Features:
- Customize your desk further by adding features such as drawers, shelves, or cable management solutions, depending on your needs.
- Final Assembly:
- Secure all components, double-check stability, and make any final adjustments. Your DIY Desk Using a Door is now ready for use.
This project not only provides a cost-effective desk solution but also allows for creativity and personalization in the design.
7. Magazine Collage

Transform your old magazines into a colorful, personalized piece of art with a DIY Magazine Collage.
Whether it’s creating an abstract pattern or depicting a scene, this project lets you tailor the aesthetic to fit your home’s decor—a fun way to recycle and rejuvenate your space!
Easy to Follow Steps
The process of crafting a Magazine Collage is an enjoyable and creative activity that enables you to convert magazine snippets into an eye-catching arrangement.
Here are the steps to construct your personalized magazine collage:
- Gather Materials:
- Collect a variety of magazines with images that inspire you. You’ll also need scissors, glue, and a canvas or sturdy paper as a base.
- Select a Theme or Concept:
- Decide on a theme or concept for your collage. It could be focused on a particular color scheme, subject matter, or emotion.
- Browse and Cut:
- Flip through the magazines and cut out images, patterns, or text that align with your chosen theme. Experiment with different sizes and shapes.
- Arrange and Organize:
- Lay out the cutouts on your canvas or paper. Play with the arrangement until you find a composition that pleases you. Consider overlapping images for depth.
- Glue the Collage:
- Once satisfied with the arrangement, glue each cutout onto the canvas. Apply glue evenly to the back of each piece and press it firmly into place.
- Add Details or Layers:
- Enhance your collage by adding additional details, such as doodles, paint, or more magazine cutouts. This step allows for personalization and creativity.
- Allow to Dry:
- Let your magazine collage dry completely before handling or framing. This ensures that the glued pieces adhere securely.
- Frame or Display:
- If desired, frame your finished collage or display it as is. Consider using a clear sealant to protect the collage and enhance its longevity.
Express yourself through the diverse and eclectic mix of images found in magazines, turning them into a unique and visually striking piece of art.
8. Yarn Wall Hanging
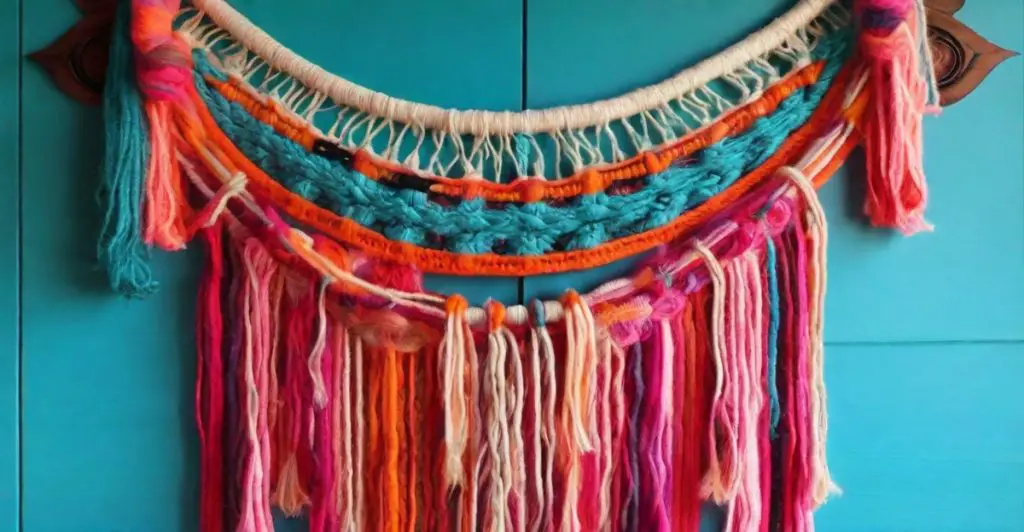
Transform a bare wall into a cozy centerpiece with a yarn wall hanging.
This project is all about the interplay of colors and textures, providing an artisan touch that’s both trendy and timeless – it’s like weaving your personality right into your decor!
Basic Steps to Get it Done:
Constructing a Yarn Wall Hanging is an effortless and imaginative DIY task that infuses a dash of bohemian style into your area.
Adhere to these basic steps to craft your personalized yarn wall hanging:
- Gather Materials:
- Choose yarn in various colors and textures, a wooden dowel or branch for hanging, and scissors.
- Prepare the Dowel:
- Cut the wooden dowel to your desired width, typically ranging from 12 to 24 inches.
- Cut Yarn Strands:
- Cut yarn strands of equal length, considering the desired length of your wall hanging. Aim for a variety of colors and textures for visual interest.
- Attach Yarn to Dowel:
- Fold each yarn strand in half, creating a loop. Place the loop under the dowel, pull the loose ends through the loop, and tighten to secure. Repeat this process, creating a row of yarn strands.
- Create Patterns and Layers:
- Experiment with different yarn colors and lengths to form patterns or layers. Trim the yarn ends as needed for a neat and even appearance.
- Add Accents (Optional):
- Integrate additional elements like beads or feathers by threading them onto selected yarn strands.
- Secure the Wall Hanging:
- Once you’re satisfied with the arrangement, tie a piece of yarn to each end of the dowel for hanging.
- Trim and Adjust:
- Trim any uneven ends to achieve a uniform look. Adjust the yarn strands for a balanced and aesthetically pleasing design.
- Hang and Enjoy:
- Find a suitable spot on your wall to hang the completed yarn wall hanging and enjoy the boho-chic vibe it brings to your space.
Feel free to customize the design based on your preferences, experimenting with different yarn types, lengths, and decorative elements.
9. Seasonal DIY Craft Ideas
Transform your old magazines into a colorful, personalized piece of art with a DIY Magazine Collage.
Whether it’s creating an abstract pattern or depicting a scene, this project lets you tailor the aesthetic to fit your home’s decor—a fun way to recycle and rejuvenate your space!
Inspiration for DIY Craft Ideas for Christmas (Internal Link to https://www.art592.com/diy-craft-ideas-christmas/)
Crafting for the seasons is a delightful way to celebrate and decorate throughout the year. Here’s a general guide on creating Seasonal DIY Craft Ideas:
- Inspiration Gathering:
- Explore various sources like craft websites, Pinterest, and magazines to gather inspiration for seasonal crafts.
- Selecting Materials:
- Choose materials based on the season, such as fall leaves, spring flowers, or winter-themed items. Common crafting materials include paper, fabric, paint, and natural elements.
- Craft Ideas for Each Season:
- Spring: Consider floral wreaths, Easter egg decorations, or nature-inspired crafts.
- Summer: Opt for beach-themed projects, sun catchers, or outdoor decor.
- Fall: Create leaf garlands, pumpkin decorations, or rustic centerpieces.
- Winter: Craft snowflakes, ornaments, or cozy indoor decorations.
- Kid-Friendly Crafts:
- Involve children with age-appropriate projects like making seasonal cards, simple ornaments, or handprint art.
- Holiday Crafts:
- Tailor crafts to specific holidays within each season. For example, Halloween-themed crafts for fall or Valentine’s Day crafts for winter.
- DIY Seasonal Decor:
- Craft decorative items such as seasonal wreaths, table centerpieces, or mantle displays to bring the festive spirit indoors.
- Personalization and Variation:
- Add a personal touch by customizing crafts to fit your taste and style. Experiment with different color schemes and textures.
- Sharing and Gifting:
- Consider crafting items as gifts for friends and family, spreading the joy of the season.
- Explore New Techniques:
- Try out various crafting techniques like decoupage, painting, or even incorporating technology for innovative projects.
- Seasonal Craft Events:
- Participate in local crafting events or virtual workshops focused on seasonal projects for additional inspiration.
Remember to adapt and modify projects based on your preferences and the materials available.
Crafting for the seasons allows for creativity and brings a touch of the changing weather into your home.
Final Thoughts on DIY Craft Ideas for Beautiful Home Decor
Crafting your home decor can give your space a personal touch. You don’t need lots of cash or fancy tools to start. With these 9 DIY ideas, you can make something special for any room.
Try making a wood plant stand or hanging shelf to show off your style. Remember, with a bit of imagination and effort, you’re all set to transform your home!
FAQs About DIY Craft Ideas for Beautiful Home Decor
null!– wp:rank-math/faq-block null –> nulldiv class=”wp-block-rank-math-faq-block”>nulldiv class=”rank-math-faq-item”>nullh3 class=”rank-math-question”>1. Can I really make my own home decor with DIY crafts?null/h3>nulldiv class=”rank-math-answer”>Absolutely! With some creativity and basic tools, you can craft unique decorations for your space. You don’t need to be a pro – just willing to try!null/div>null/div>nulldiv class=”rank-math-faq-item”>nullh3 class=”rank-math-question”>2. What kind of materials do I need for DIY home decor projects?null/h3>nulldiv class=”rank-math-answer”>You might be surprised that many DIY projects use everyday items – think paper, fabric scraps, old jars, or wood pieces. Gather what you have at home and let’s get started.null/div>null/div>nulldiv class=”rank-math-faq-item”>nullh3 class=”rank-math-question”>3. Are these nulla href=”https://www.art592.com/diy-craft-ideas/”>DIY craft ideasnull/a> budget-friendly?null/h3>nulldiv class=”rank-math-answer”>Yes, indeed! Do-it-yourself means you often repurpose things you already own into something new and awesome for your home without spending big bucks.null/div>null/div>nulldiv class=”rank-math-faq-item”>nullh3 class=”rank-math-question”>4. How much time will I spend on a DIY craft project for my home?null/h3>nulldiv class=”rank-math-answer”>Well, it varies—some crafts are quick fixes that add instant charm in minutes; others could take an afternoon of fun effort.null/div>null/div>null/div> null!– /wp:rank-math/faq-block –>Sources:
- heytherehome.com – DIY Wooden Plant Stands
- woodshopdiaries.com – DIY Tiered Plant Stand
- instructables.com – Wood Plant Stand
- skillshare.com – How to Make Wooden Hanging Shelves
- youtube.com – How To Build THE BEST Hanging Rope Shelf!
- modpodgerocksblog.com – 20+ Coffee Bar Signs to Make for Your Home
- thediymommy.com – How to Make an Easy DIY Coffee Bar Sign with a Cricut
- southerncrushathome.com – How to Make a Coffee Bar Sign with an Image Transfer
- aboxoftwine.com – How to Add Tassels to a Blanket
- womansday.com – How to Make a DIY Tassel Throw Blanket
- heatherednest.com – Make a FUN and Easy DIY Tassel Throw
- thehandcraftedhaven.com – DIY Rustic Farmhouse Style Coat Rack
- foodanddiy.com – DIY Farmhouse Coat Rack
- prodigalpieces.com – DIY Coat Rack ~ Farmhouse Style
- beautyforasheshome.com – Farmhouse Style Shiplap Coat Rack DIY
- instructables.com – DIY Desk From Solid Wood Six-Panel Door
- nourishandnestle.com – From Door to DIY Desk!
- aboutamazon.com – How to build your own Amazon door desk
- liveoaknest.com – DIY Old Door Desk
- renovatedfaith.com – Sophisticated DIY Desk Out of a Door
- younghouselove.com – How To Build A Desk With An Old Hollow Core Door
- artsyfartsylife.com – How To Make A Magazine Collage Mixed Media
- modpodgerocksblog.com – Magazine Collage (Make with Any Design!)
- ehow.com – How to Make Collage Art Using Magazine Clippings
- wonderfuldiy.com – 15 Magazine Collage Ideas – Cut, Paste and Innovate
- feltmagnet.com – Magazine Collages: Tips and Techniques
- instructables.com – How to Make a Paper Collage : 10 Steps (with Pictures)
- diycandy.com – Yarn Wall Hanging on a Budget in a Few Easy Steps
- her-happy-home.com – DIY Yarn Wall Hanging in Just 20 Minutes!
- thediydreamer.com – How to Make a Yarn Wall Hanging
- thecraftyblogstalker.com – 37 DIY Yarn Wall Hanging Crafts With Clear Instructions
- YouTube – How I make DIY Boho Yarn Wall Hanging
- flamingotoes.com – DIY Macrame with Yarn Wall Art – Home Decor
- craftsbyamanda.com – Seasonal Crafts: projects for spring-winter
- allfreeholidaycrafts.com – Spring Crafts, Fall Crafts, and so Much More
- pinterest.com – Seasonal DIY and Craft Ideas

Leave a Reply