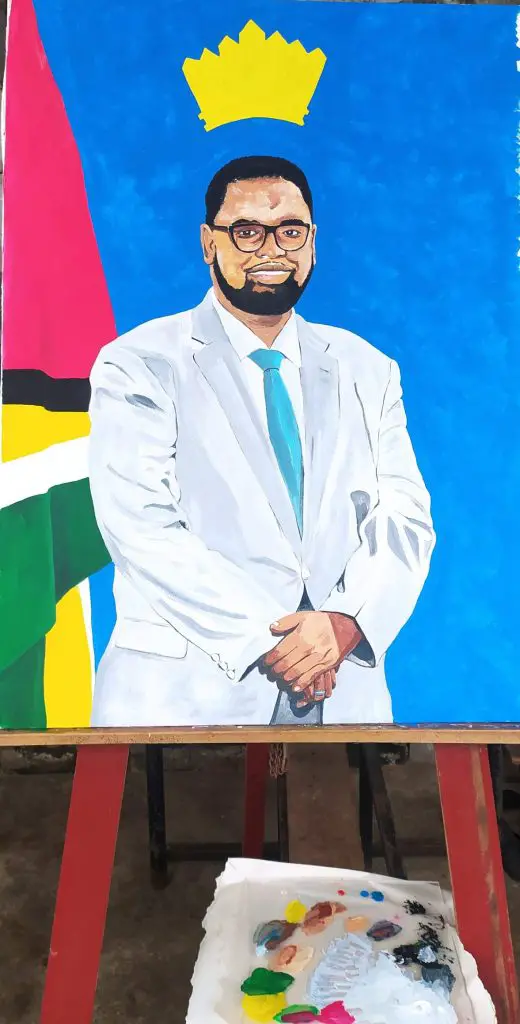
How to Paint a Realistic Acrylic Portrait
Artist: Randy Abubakar Bentinck
Medium: Acrylic on Canvas
Dimensions: 45×32 inches
Year: 04/23/2022
Portrait painting from photos has become increasingly popular with contemporary artists. With the continued growth and development of technology and the abundance of digital photos, many artists are now turning to photography as their source of inspiration for painting portraits.
Painting portraits from photos are often more affordable and faster to execute than traditional portrait painting techniques where a sitter comes into the artist’s studio and sits for sessions at a time. Before, the painting is completed.
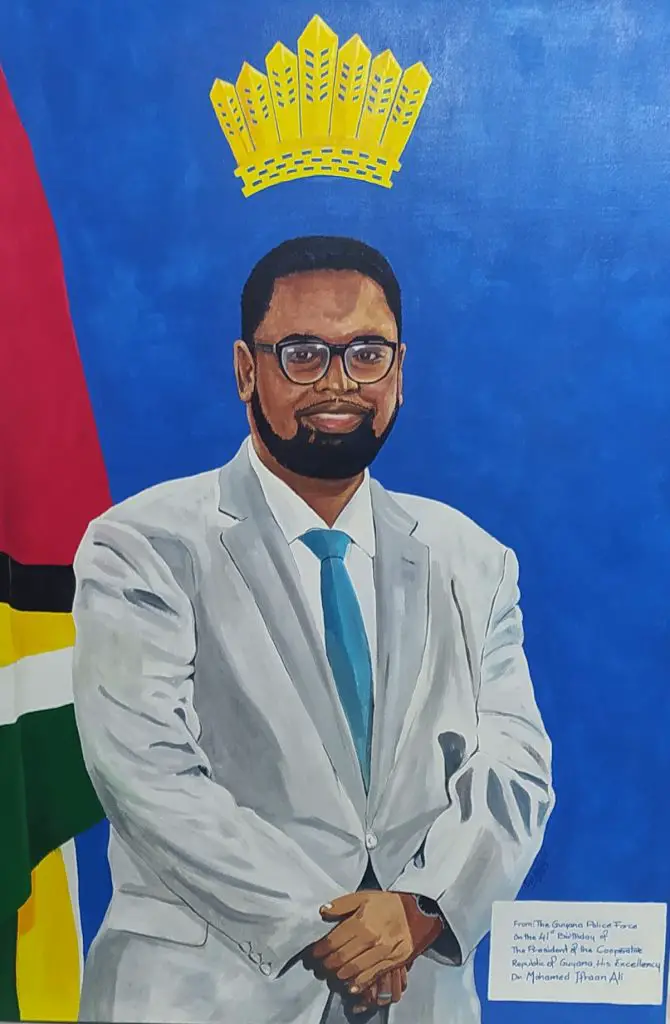
In this post, I will walk you through the process of how I painted this commissioned portrait of the President of Guyana, Dr. Mohamed Irfaan Ali, in less than 24 hours.
Let’s dive right in!
- How to Paint a Realistic Acrylic Portrait
- Consider the Portrait Composition
- Draw the Outline of the Portrait
- Choose the Right Medium
- Apply the First Layer of Paint
- How to Paint a Realistic Acrylic Portrait-the Finished Composition
Why a Portrait Painting of the President of Guyana?
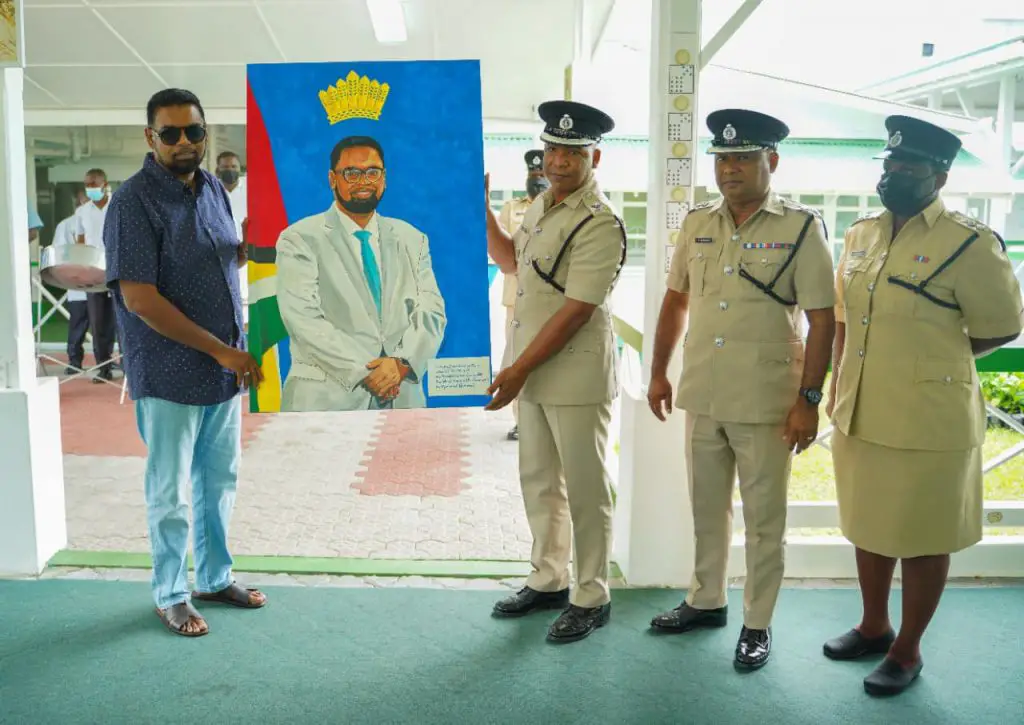
The Guyana Police Force commissioned this portrait on the 41st birthday of the President of the Cooperative Republic of Guyana, His Excellency, Dr. Mohamed Irfaan Ali.
This portrait was not only unique because of the subject of the portrait but it was to be completed in less than 24 hours and this is where my first challenge came.
My second challenge was would I be able to capture the likeness in such a short time frame and finally how will I overcome the negative self-talk and voices in my head that will question and doubt my ability to complete this project satisfactorily.
The Crucial Timeline of this Portrait Painting:
- Thursday morning, 21st of April – the piece commissioned.
- Thursday evening – agreement finalized.
- Thursday evening – stretched canvas on plywood and primed with flat emulsion (three coasts on a rainy evening delayed drying time). The blow dryer was my best friend here. [2 hours counting drying time]
- Thursday night – layout the composition using a projector. [15 minutes of work]
- Friday morning, the 22nd of April didn’t work in the morning because of classes with my intermediate drawing students.
- Friday afternoon – 1:00 P.M. starts applying color to the canvas, focusing on the head, face, and hands. Worked until 6:00 p.m. [5 hours of work]
- Friday night, 8:00-9:00 p.m. – worked on the jacket. [1 hour of work]
- Saturday morning, 23rd of April – 7:00-8:00 a.m. build the stretcher and remove the canvas from plywood, and place it on the stretcher. [1 hour of work]
- Saturday morning, from 8:00 A.M. to 12:00 P.M. worked on adding final details to the face and getting some critical feedback from a few of my painting students (this was very helpful as the pressure of time will cause you to miss some important details) [4 hours of work]
- Saturday morning, 12:00 P.M. stopped working to allow the painting to dry so I can apply the acrylic varnish. [1 hour of work]
- Saturday afternoon,1:00 p.m. apply the first coat of Liquitex gloss varnish and let it dry for one hour.[1 hour of work]
- Saturday afternoon, 2:00 p.m. apply a second coat and let it dry for another hour. [1 hour of work]
- Saturday afternoon, 3:00 p.m. apply the final coat of varnish and use a hair blow dryer to help speed up the drying process. [1 hour of work]
- Saturday afternoon, 3:30 p.m. prepare the painting for delivery. [10 minutes of work]
- Total time spent working on the painting: 17 hours and 25 minutes
- Saturday afternoon, at minutes to 4:00 p.m. I delivered and unveiled the finished portrait painting to a smiling and satisfied police officer along with several of her curious colleagues who wanted to see what I produced in such a short time span.
Choose the Right Photo is Important

It’s difficult to choose the right photo to paint a portrait. The photo should accurately portray the person’s personality and appearance. It’s important to consider the background, clothes, and accessories. You also need to consider the painting’s purpose.
In my case, because this was a commissioned piece, the client would have made the choice of which picture to use. I had to ensure it was a high-quality digital photo. This will allow me to zoom in and out to study important details and features in the photograph without the image getting pixilated.
Consider the Portrait Composition
When painting a portrait, it is important to consider the composition of the painting. The placement of the subject within the picture space.
Cropping and Adjusting the Composition
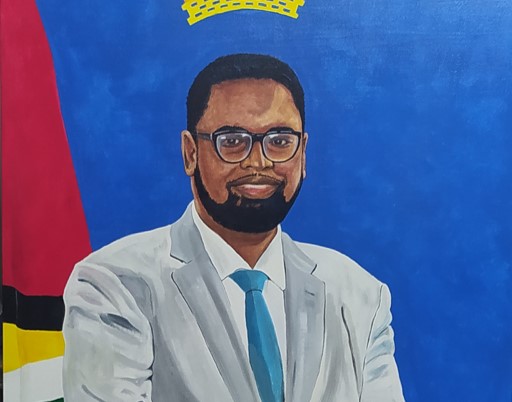
For this piece, I cropped out small bits from the right and left sides of the photo and shifted the cacique crown directly over the President’s head as was requested by the client. Compare the original photo with the finished portrait below to see what slight difference this made.


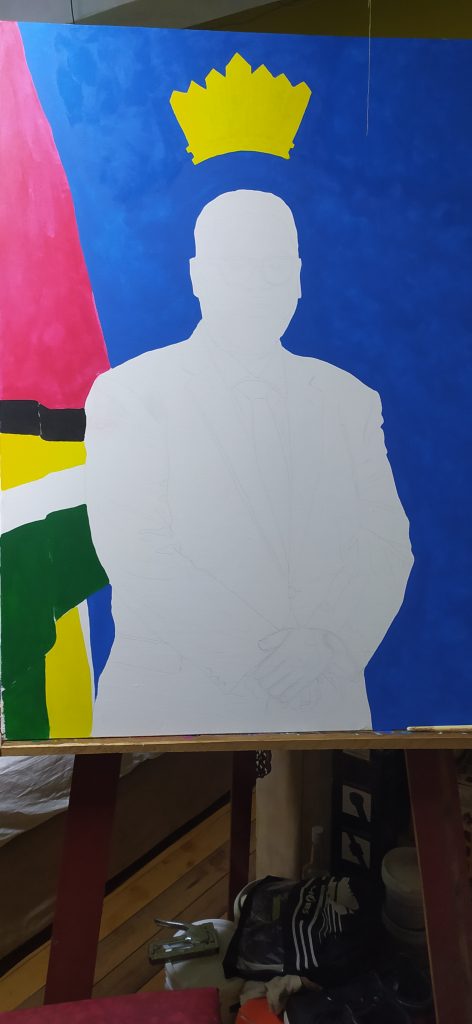
Draw the Outline of the Portrait
This step is critical because it is the foundation upon which you will build as the painting progress. If this stage is weak it will show up later on in the painting and make the process hell. Thus the reason for using a projector to minimize such errors.
How to Outline the Portrait Faster

When you are pressed for time to complete a realistic acrylic portrait, there are several approaches you can use to quickly get the outline of your image on the canvas.
- use the grid system
- trace the image using carbon paper
- use a projector
This was critical in order to capture the features and proportion of the subject. Once the outline is drawn, I started to fill in the details.
For more information on how to lay out your composition on the canvas faster, see the video below by a contemporary portrait artist, Alpay Efe. Listen to his thoughts on using a projector from around the 3 minutes to the 4-minute mark in the video timeline:
Choose the Right Medium
When painting a realistic acrylic portrait that has such a tight deadline line, working with a fast-drying painting medium is often your best choice. Acrylic paint to the rescue!
Sargent Art Acrylic Paints
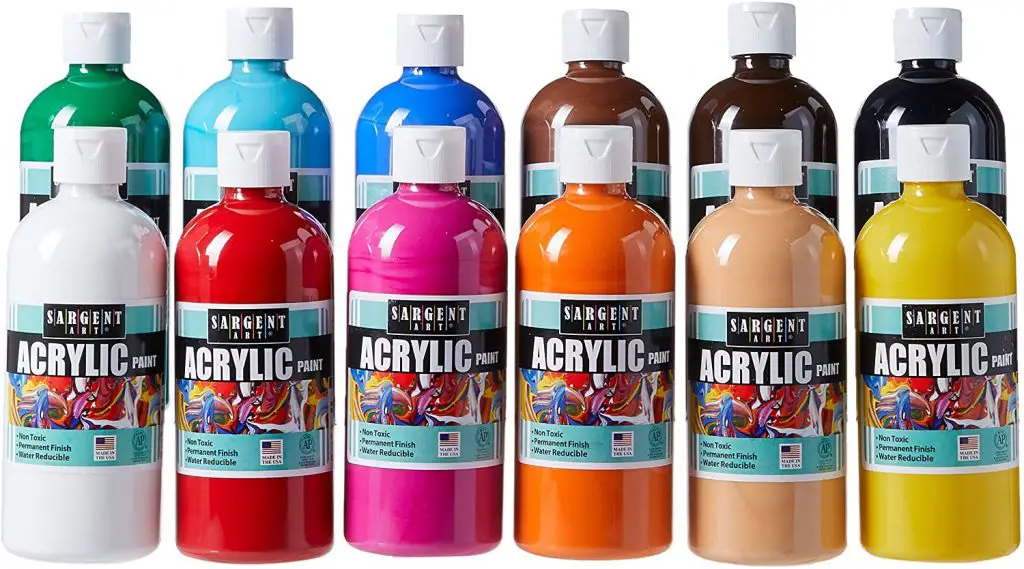
I choose the Sargent brand of acrylic paintings because of its non-fading properties, its rich vivid pigments, the brilliant matte finish it gives, the fast dry formula that helps the speed of the process, and that it is non-toxic.
Apply the First Layer of Paint
This stage gets you off and running. The first brushstroke on the canvas is the best way to calm the butterflies and silence the inner critique.
How to Paint a Realistic Acrylic Portrait: Applying the Local Color
I started with the background and the flag first because I wanted to get rid of all the white space which messes with you psychologically. The aim here is just to use flat colors to fill in various parts of the composition, or as one of my art tutors used to say, ‘the local color of the object.’
Adding Details and Highlights
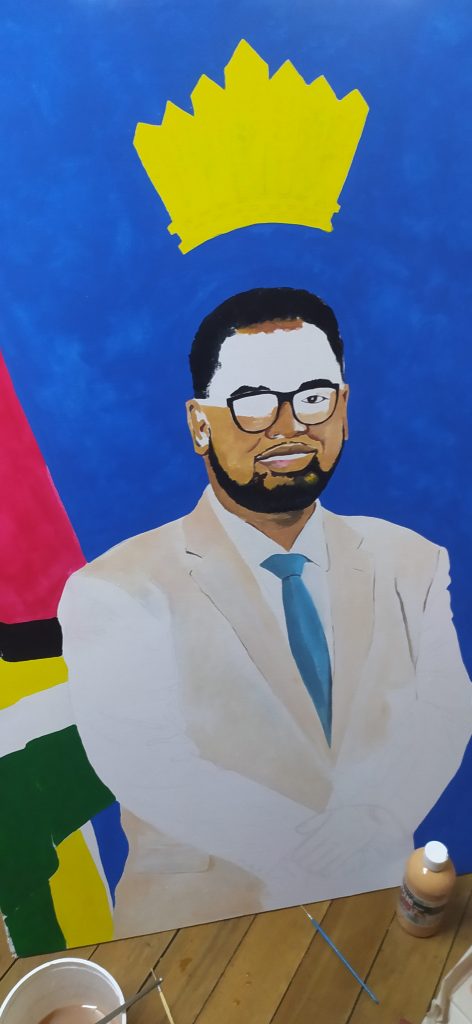
At this stage, I was focused on capturing the light and dark areas of the subject while striving to get the basic skin tones.
I wasn’t in love with the initial tones I got, but I pressed on to save time. The clock was ticking, and I wasn’t seeing any sign of a convincing likeness. This is the goal of these kinds of commissioned pieces. The likeness is key!
How to Paint a Realistic Acrylic Portrait by Adding Details for Realism
The likeness was much better at this stage, but the skin tone was way off and this was at the end of the Friday afternoon session I was mentally taxed and went to bed with lots of questions and lingering doubts. I was dissatisfied at this stage and worried, to be honest.
How to Paint a Realistic Acrylic Portrait-Finishing Up
The Importance of Positive Self Talk
I woke up Saturday morning early and analyse the painting, dig deeper, and shouted to myself come on, Abu, you got this!’ All the while thinking if I flop on this one my painting students will roast me mercilessly I won’t hear the end of it (smiling…that was the motivation I needed).
Know and Trust Your Artistic Abilities
I reminded myself that I did this before I went back to the fundamentals of portrait painting. I opened the windows, let in the daylight, and started the last phase of adding details and finishing touches.
Solisticing Constructive Art Critique
I sent photos of the portrait painting to some of my painting students and asked them for constructive critique because I knew I would have missed simple things.
The Importance of Having Good People in Your Artistic Corner
My students gave me some very good feedback which allowed me to correct, adjust and complete this task in a satisfactory stage.
A painting is never finished, you just stop painting and in this case, the deadline forced me to stop.
The skin tone was better, and the likeness was there, and I felt confident signing my name on this one. What a journey!
How to Paint a Realistic Acrylic Portrait-the Finished Composition
This post on How to Paint a Realistic Acrylic Portrait was written with my painting students in mind. I demand a lot from them and they don’t always get to see my work, but I hope that by sharing the journey in creating this portrait, they will find some teachable moments that will serve them well.
As my students prepare for their final year exams, I know they will face some of the same challenges I faced both technically and mentally, but I urge them to dig deeper and produce their best every time.
This 45″ X 32″ portrait painting was no cakewalk, but I learned a lot about myself during the process. In the end, my client was pleased. And I always say to my students that your client’s satisfaction is more important than non-constructive criticism and critics.
Thank you for taking the time to read this post. Please leave a comment or constructive criticism below.

Leave a Reply to Alyce Cameron Cancel reply